• Home
  • Forum
  • Shop
  • Super Rugby
    • ACT Brumbies
    • Melbourne Rebels
    • NSW Waratahs
    • Queensland Reds
    • Western Force
  • Wallabies
    • All Blacks
    • Argentina
    • Barbarians
    • British & Irish Lions
    • England
    • Fiji
    • France
    • Ireland
    • Italy
    • Japan
    • Samoa
    • Scotland
    • Wales
  • Women’s
  • World Cup
    • 2023 Rugby World Cup Fantasy League
  • Sevens
  • Schoolboy
  • Podcast

Subscribe to Updates

Get the latest creative news from FooBar about art, design and business.

What's Hot

Nutta on the loose: tackling and an open letter from RA

December 1, 2023

Can we all play together?

November 30, 2023

Moneyball.

November 29, 2023
Facebook Instagram YouTube X (Twitter)
Green & Gold Rugby
0 Shopping Cart
Facebook Instagram YouTube X (Twitter)
  • Home
  • Forum
  • Shop
  • Super Rugby
    1. ACT Brumbies
    2. Melbourne Rebels
    3. NSW Waratahs
    4. Queensland Reds
    5. Western Force
    6. View All

    Friday’s Rugby News – 23/6/23

    June 22, 2023

    Monday’s Rugby News – 12/6/23

    June 11, 2023

    Friday’s Rugby News – 9/6/23

    June 9, 2023

    Monday’s Rugby News – 5/6/23

    June 4, 2023

    Monday’s Rugby News – 5/6/23

    June 4, 2023

    Monday’s Rugby News – 29/5/23

    May 28, 2023

    Monday’s Rugby News – 15/5/23

    May 14, 2023

    Monday’s Rugby News – 8/5/23

    May 7, 2023

    Monday’s Rugby News – 5/6/23

    June 4, 2023

    Monday’s Rugby News – 29/5/23

    May 28, 2023

    Monday’s Rugby News – 15/5/23

    May 14, 2023

    Monday’s Rugby News – 8/5/23

    May 7, 2023

    The Reds narrowly defeat the Wild Knights

    November 5, 2023

    Monday’s Rugby News – 5/6/23

    June 4, 2023

    Thursdays Rugby News 1/6/23

    June 1, 2023

    Monday’s Rugby News – 29/5/23

    May 28, 2023

    Monday’s Rugby News – 5/6/23

    June 4, 2023

    Monday’s Rugby News – 29/5/23

    May 28, 2023

    Monday’s Rugby News – 15/5/23

    May 14, 2023

    Monday’s Rugby News – 8/5/23

    May 7, 2023

    Happy’s Thursday’s Rugby News – A New Dawn

    November 23, 2023

    The Chewsday Chew – anything on LinkedIn?

    November 21, 2023

    Mad Monday with Brisneyland Local #16: Roll Up, Roll Up.

    November 20, 2023

    Mad Monday with Brisneyland Local #15: Who Dares Wins, unless you’re Rugby Australia.

    November 13, 2023
  • Wallabies
    1. All Blacks
    2. Argentina
    3. Barbarians
    4. British & Irish Lions
    5. England
    6. Fiji
    7. France
    8. Ireland
    9. Italy
    10. Japan
    11. Samoa
    12. Scotland
    13. Wales
    14. View All

    In from the side – one Kiwi’s view of the final and some musings (opinion) on where the game’s at.

    November 2, 2023

    Mad Monday with Brisneyland Local #14: There can only be one.

    October 30, 2023

    Final Live Review: New Zealand v South Africa -Saturday 28 October

    October 28, 2023

    The Chewsday Chew – Brotherhood

    October 24, 2023

    Friday’s Rugby News: Love thy Neighbour?

    October 19, 2023

    Happy and Crescent’s Thursday Rugby News – Broken Faith

    October 19, 2023

    Mad Monday with Brisneyland Local #13: RWC Quarter Finals and Australian Coaching Shenanigans!

    October 16, 2023

    Friday’s Rugby News: ‘Banzai’

    October 12, 2023

    Thursday’s Rugby News 25/5/23

    May 25, 2023

    Monday’s Rugby News – 15/11/21

    November 15, 2021

    Monday’s Rugby News – 20/09/21

    September 20, 2021

    Five observations from the Barbarian match

    November 4, 2014

    Thursdays Rugby News 1/6/23

    June 1, 2023

    Monday’s Rugby News – 13/3/23

    March 12, 2023

    Monday’s Rugby News – 20/09/21

    September 20, 2021

    Thursdays Rugby News

    August 19, 2021

    Mad Monday with Brisneyland Local #13: And then there were Two!

    October 23, 2023

    Game Review: England v South Africa – Semi-Final 2 – Saturday 21 October

    October 22, 2023

    Friday’s Rugby News: Love thy Neighbour?

    October 19, 2023

    Happy and Crescent’s Thursday Rugby News – Broken Faith

    October 19, 2023

    Happy and Crescent’s Thursday Rugby News – Broken Faith

    October 19, 2023

    Friday’s Rugby News: ‘Banzai’

    October 12, 2023

    Happy’s Thursday Rugby News – Anti Wallaby XV (XXIII)

    October 5, 2023

    Game Review: Fiji v Georgia – Pool C – Saturday 30th September

    October 1, 2023

    Happy and Crescent’s Thursday Rugby News – Broken Faith

    October 19, 2023

    Game Pre/Review: France v South Africa – Quarter-Final 4 – Sunday 15 October

    October 15, 2023

    Friday’s Rugby News: ‘Banzai’

    October 12, 2023

    Mad Monday with Brisneyland Local #12: And so the Pool Games come to a close!

    October 9, 2023

    Happy Thursday Rugby News – The RWC Myth

    October 26, 2023

    Happy and Crescent’s Thursday Rugby News – Broken Faith

    October 19, 2023

    Mad Monday with Brisneyland Local #13: RWC Quarter Finals and Australian Coaching Shenanigans!

    October 16, 2023

    Friday’s Rugby News: ‘Banzai’

    October 12, 2023

    Happy’s Thursday Rugby News – The Best of the Rest

    October 12, 2023

    Mad Monday with Brisneyland Local #12: And so the Pool Games come to a close!

    October 9, 2023

    Review: France v Italy – Pool A – 6 October 2023

    October 7, 2023

    Mad Monday with Brisneyland Local #10: Did we just see the Final?

    September 25, 2023

    Mad Monday with Brisneyland Local #15: Who Dares Wins, unless you’re Rugby Australia.

    November 13, 2023

    The Reds narrowly defeat the Wild Knights

    November 5, 2023

    Happy’s Thursday Rugby News – The Best of the Rest

    October 12, 2023

    Mad Monday with Brisneyland Local #12: And so the Pool Games come to a close!

    October 9, 2023

    Mad Monday with Brisneyland Local #12: And so the Pool Games come to a close!

    October 9, 2023

    Game Pre/Review: Japan v Samoa – Pool D – Thursday 28 September

    September 28, 2023

    Game Review: Argentina v Samoa – Pool D – Friday 22 September

    September 22, 2023

    Mad Monday with Brisneyland Local #9: David v Goliath

    September 18, 2023

    Happy’s Thursday Rugby News – Changing the Narrative

    November 9, 2023

    Happy’s Thursday Rugby News – The Best of the Rest

    October 12, 2023

    Mad Monday with Brisneyland Local #12: And so the Pool Games come to a close!

    October 9, 2023

    Ireland v Scotland: Live Chat

    October 8, 2023

    Happy’s Thursday’s Rugby News – A New Dawn

    November 23, 2023

    Mad Monday with Brisneyland Local #13: RWC Quarter Finals and Australian Coaching Shenanigans!

    October 16, 2023

    Friday’s Rugby News: ‘Banzai’

    October 12, 2023

    Mad Monday with Brisneyland Local #12: And so the Pool Games come to a close!

    October 9, 2023

    The Chewsday Chew – anything on LinkedIn?

    November 21, 2023

    Mad Monday with Brisneyland Local #16: Roll Up, Roll Up.

    November 20, 2023

    Mad Monday with Brisneyland Local #15: Who Dares Wins, unless you’re Rugby Australia.

    November 13, 2023

    Happy’s Thursday Rugby News – Schadenfreude

    November 2, 2023
  • Women’s

    A personal view

    November 27, 2023

    Happy’s Thursday’s Rugby News – A New Dawn

    November 23, 2023

    WXV 2023 Weekend 3 results

    October 30, 2023

    WXV 2023 Weekend 2 results

    October 22, 2023

    WXV Weekend One Results

    October 17, 2023
  • World Cup
    1. 2023 Rugby World Cup Fantasy League
    2. View All

    Nutta on the loose: tackling and an open letter from RA

    December 1, 2023

    Can we all play together?

    November 30, 2023

    Moneyball.

    November 29, 2023

    The Chewsday Chew – here’s to the ‘grassrooters’.

    November 28, 2023

    Mad Monday with Brisneyland Local #16: Roll Up, Roll Up.

    November 20, 2023

    Mad Monday with Brisneyland Local #15: Who Dares Wins, unless you’re Rugby Australia.

    November 13, 2023

    2023 RWC Team Ratings

    November 8, 2023

    The Chewsday Chew – RWC23 Team of the Tourney

    November 7, 2023
  • Sevens

    Happy’s Thursday Rugby News – Changing the Narrative

    November 9, 2023

    Australia’s Iona College brave but beaten in Rugby Heritage Cup Final

    September 7, 2023

    Brisbane’s Iona College through to the world semi-finals of Rugby Heritage Cup

    September 6, 2023

    Happy Thursdays Rugby News 27/7/23

    July 27, 2023

    Thursday’s Rugby News 20/3/23

    April 20, 2023
  • Schoolboy

    Nudgee College win 44th QLD GPS Rugby Premiership

    September 14, 2023

    Thursday’s Rugby News 24/3/22

    March 23, 2022

    Rugbycology report -Super Rugby AU Round 6

    August 10, 2020

    It all starts with ambition: A schools rugby analysis piece

    August 4, 2019

    Australian Schools Championships – the tradition continues

    July 4, 2019
  • Podcast

    The Dropped Kick-Off 103 – McLennan falls in Coup de Tah

    November 20, 2023

    The Dropped Kick-Off 102 – Upsetting Municipal Councils (+ RWC 2023 GF) w Yowie

    October 24, 2023

    The Dropped Kick-Off 101 – A Little Bit Of Chaos w Happyman

    October 12, 2023

    Happy’s Thursday Rugby News – The Best of the Rest

    October 12, 2023

    The Dropped Kick-Off 100 – Here Comes The Fozz w KARL (World Cup Bites II)

    October 6, 2023
Green & Gold Rugby
Home»Super Rugby»ACT Brumbies»The Anatomy of a Try – Liam Wright vs Brumbies
ACT Brumbies

The Anatomy of a Try – Liam Wright vs Brumbies

Graeme ForbesBy Graeme ForbesSeptember 14, 202029 Comments0 Views
Facebook Twitter Pinterest LinkedIn Tumblr WhatsApp VKontakte Email
Share
Facebook Twitter LinkedIn Pinterest Email

On occasion heavily criticised, on occasion praised, the quality of attacking play during Super Rugby AU has been both interesting and quite divisive.

The clear steps teams have made on Defence has been huge. A return to the values of the 90’s and early 00’s when Aussie teams were some of the best defensive units around. If you’ve read Eddie Jones Biography he continually references how much defence was a focus of those great teams, the ’99 wallabies, the ’02 Brumbies etc…

It’s obviously been a huge focus. You still need to score more points than the opposition though so it’s also been good to see teams developing their attacking play over the last 10 weeks, even if it was not at the same rate.

It’s not always worked, but the intent has been good and that’s an important thing

The intention in attacking play is rarely talked about but it’s a major key in how good an attacking side can be. It’s something we’ve seen the New Zealand sides demonstrate time and time again and I don’t mean simply scoring tries (which is a given) but more the knowledge of where you’re going to stress the defence, where that line break is coming from and how you’re going to manufacture it?

There are a multitude of ways to do this, strike plays, phase maps/patterns, it’s what suits your teams talents best.

Ahead of the Super Rugby AU final I wanted to go back to the last Reds vs Brumbies game and look at the two teams attacking play.

From an analytical viewpoint it’s a good game to look at we saw two teams attacking with genuine intent, not just “heads up, let’s have a look”. One team nailed it the other, not so much but the two teams that took to the field knew exactly what they wanted to do and how they were going to try and do it.

That’s a great thing because over the course of Super Rugby AU that hasn’t always been evident to my eyes.

Some of that has been down to the new kicking laws, which on occasion has been awesome but has also lead to some pretty aimless kicking as teams struggle to find the best way to use them to their advantage.

Regardless, back to the main focus, attack.

We can actually sum both teams attacking play up in two quick sentences.

The Brumbies Started Deep and Stayed Deep. The Reds Executed on the tackle line.

I want to look at Liam Wright’s try in this game I think it’d be good to go through the Brumbies first attack as I think the contrast in how the teams set out to attack was very interesting.

The Brumbies Deep Attack

Playing deep isn’t an issue if it serves a purpose.

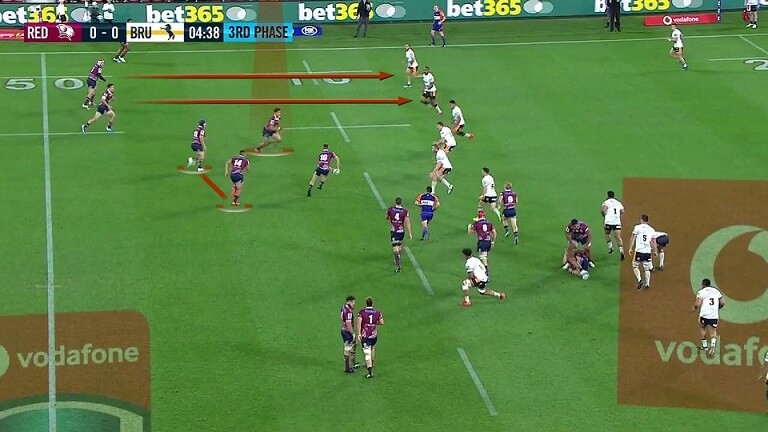
In this instance the Brumbies wanted to play a “wide wide” pattern that would allow them to attack the Reds defence where it is thinnest.

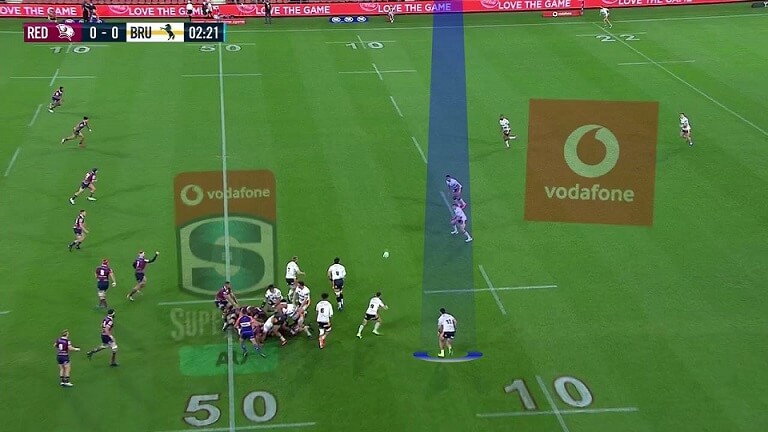
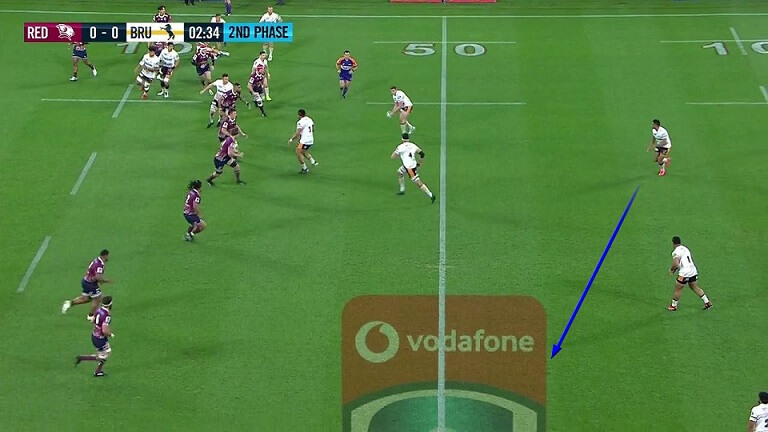
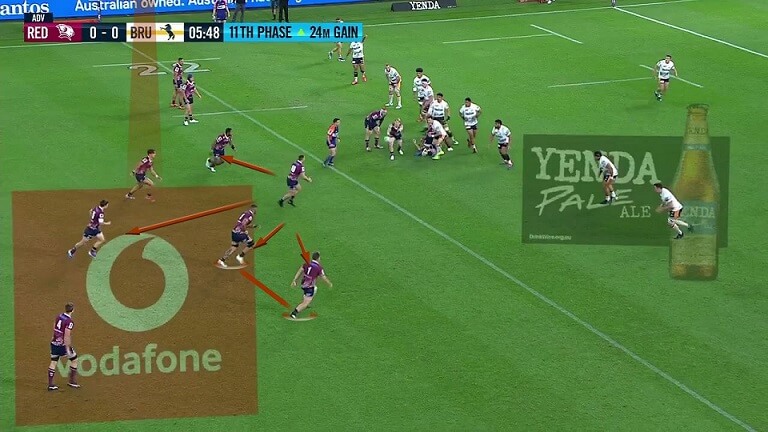
Brumbies win a free kick at the scrum. White immediately taps and goes to the midfield.

Perhaps a better option here would have been for White to pass the ball back to Samu who was on the mark and looking for the ball, so he could have gone early, or tap and go himself to get some yards.

Instead he plays an ambitious pass and it’s a great pick up by Simone but straight away we know Wright isn’t in a position to create the extra man on the chase around even without the quick tap so at best it’s a man on man attack.

01 11 Doesnt Follow

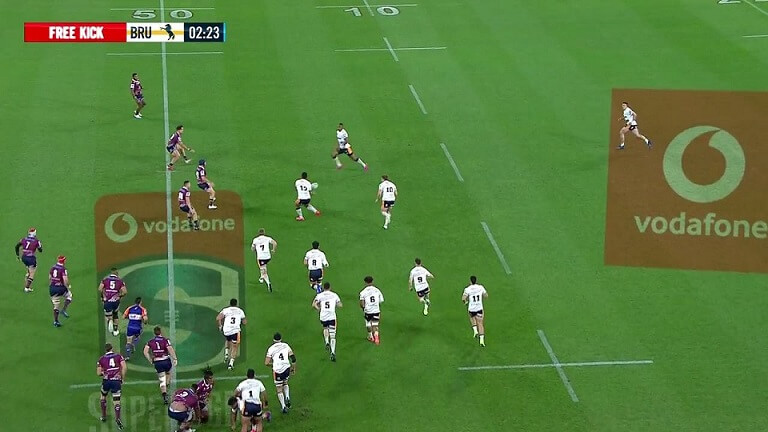
This is not a strike move this purely a launch play designed to get the ball the edge and eat up some easy yards.

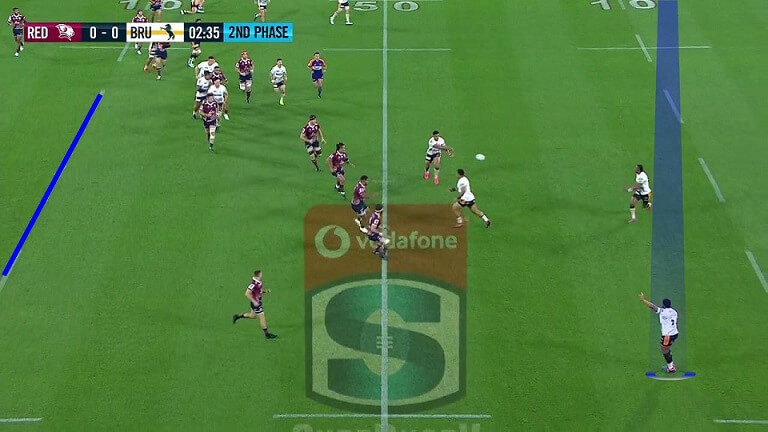
Simone plays out the back to Kuenzle, but it’s very clear Kuridrani is some way off being a threat both wide and flat resulting in none of the Reds defenders being sucked in by him and Simone plays out the back.

The issue is the ball is just moving laterally (remember a key principle of Rugby is go forward with the ball).

02 Kuridrani too Deep

While this isn’t such an issue at this point the depth of that point of execution does become as things played out through this move and the wider match.

O’Connor (JOC) and Stewart safe in the knowledge Kuridrani was a decoy start folding under and Petaia and Daugunu are able to just slide and track the ball.

03 Reds fold under

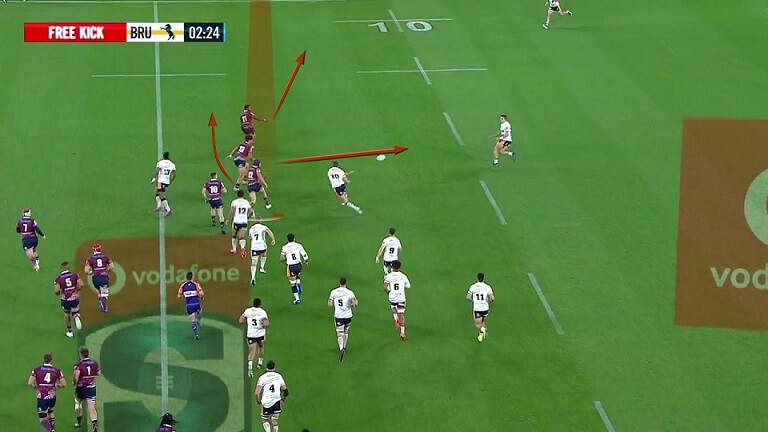
The Brumbies were never too interested in fixing the Reds, the speed of the ball through the hands was what was important and has given Muirhead space to run in.

Again though, there is no support coming from deep and everyone is in front of him – which further adds weight to the idea this is all about getting the ball to the edge and turning the Reds players out to chase.

04 Muirhead wide Reds Fold Under

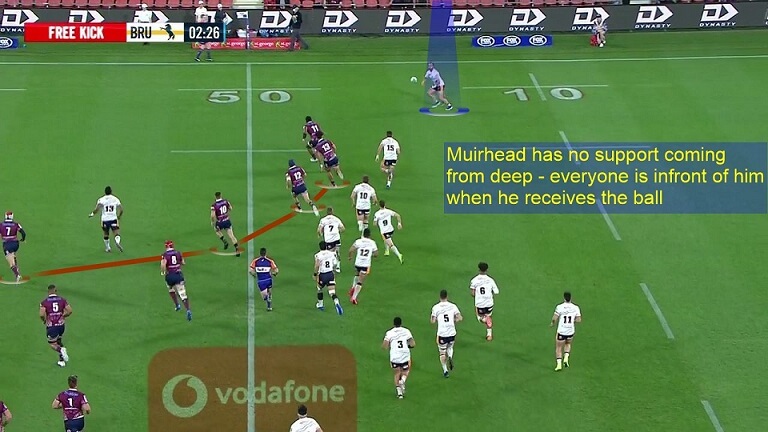
Muirhead makes some easy yards before he is dragged down. 

This is schoolboy rugby and it’s effective.

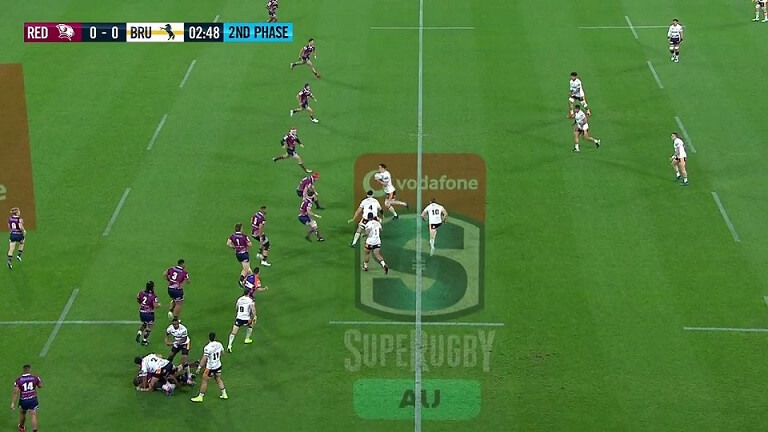
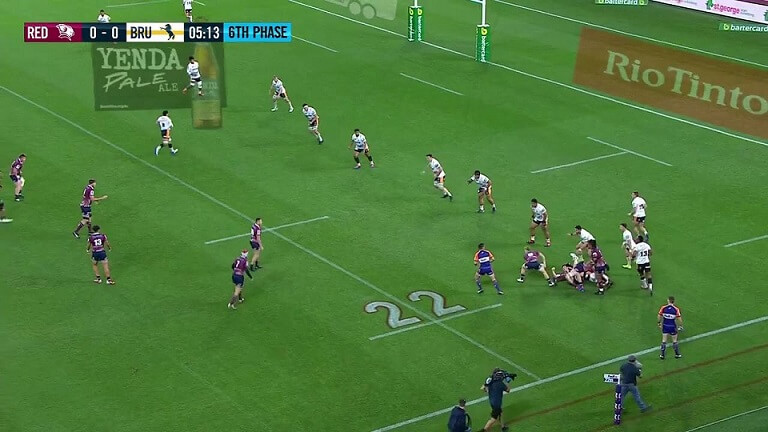
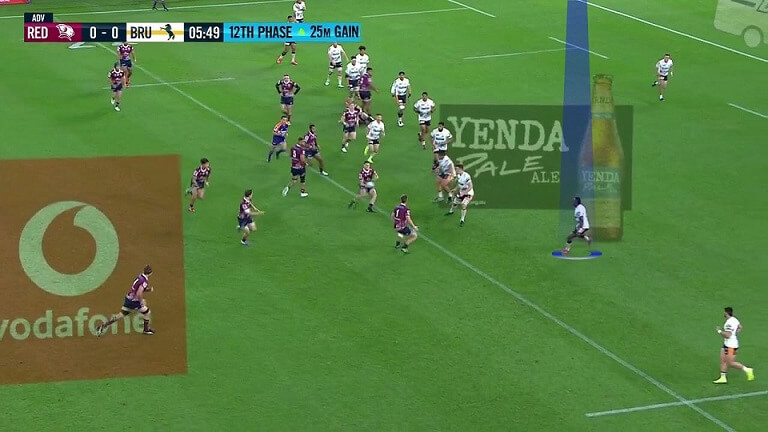
From the recycle the Brumbies again use the deep alignment to go wide wide, with the first pod holding the inside defence just, White plays to Kuenzle who plays to Simone.

05 Lateral Brumbies

Here are where issues are starting to creep in. The first is look how lateral the running has become?

The second is the fact that Kuridrani when he receives the ball is almost 20m behind the gain line and all his support is either lateral or in front of him.

06 20m Deep

This is a different situation to Muirhead having no support in the previous phase as Kuridrani is in the middle of the pitch with defenders either side of him.

via GIPHY

He does exactly the right thing and cuts back inside to try and find support.

It’s loose between Kuridrani and Simone but when it’s tidied up we see another wide attack set up with a 3-2 formation giving the Reds the impression the Brumbies will play the same side to the far touchline.

07 Carry Pod - Reload

In fact the Brumbies however are reloading this near side and as White approaches he checks back to see who is defending short for the Reds. Having made his decision never looks right knowing he is attacking back this short side.

via GIPHY

It works and but for a sliced chip kick by Wright trying to keep it in (perhaps a better option would have been to kick long and chase) the Brumbies may have well gone close.

Regardless this is clearly a mapped out sequence of play. The Brumbies are looking to go wide wide, eat up yards and then once in behind the Reds (over the gain line) bounce back to negate the Reds ability to regenerate line speed. Hopefully exploiting the thinning out defence they’ve created.

The sequence of play ends when the Brumbies return the clearance kick and give a penalty away for holding in.

Now here is the Reds first attack leading to Wright’s try.

The Anatomy of a Try.

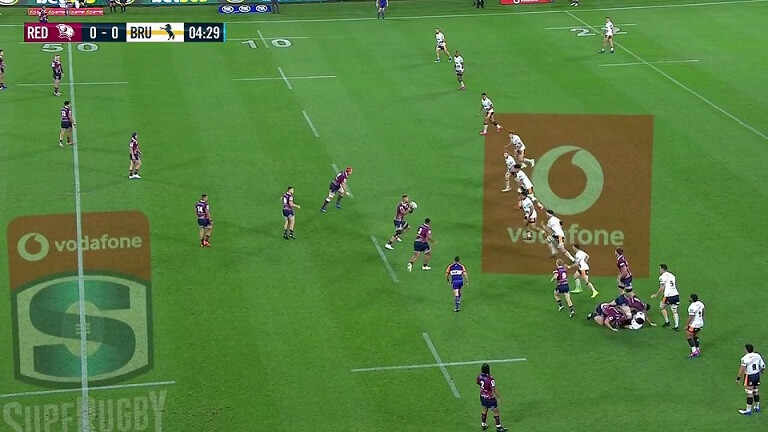
The sequence starts with a messed up lineout but with the Reds first to react they are able to get straight across the gain line and set up their next phase on the front foot.

Throughout, keep a close look on how much the Reds push up and engage the tackle line, making defenders function under pressure. That allows them to force defenders into making decisions and stop them sliding out. In contrast the deep attack from the Brumbies allowed the defence to make many decisions safe from any form of pressure.

First of all look at how close to the tackle line the Reds carry unit is?

Secondly also note how close to that JOC is, this allows him to talk to the unit and also keeps him hidden away and as a very live option the Brumbies have to think about.

It’s a little detail but options is something the Reds do very well here.

via GIPHY

Notice how close to the tacklers Salakaia-Loto gets the ball – again this serves two things.

The first is the Brumbies have to engage, they can’t drift off him.

Secondly it robs the Brumbies of momentum, they don’t have the time to generate the speed to facilitate a truly dominant tackle and even though Salakaia-Loto doesn’t bust the line wide open he doesn’t get hit back, is able to spin through the contact and get to ground.

02 JOC Doesn't move

Also note how JOC doesn’t move at all, he just allows the pod to carry and he drifts across into position for the next phase.

Now options and decision making are a big thing in this Reds attack, note below JOC is already operating under pressure and has four options.

via GIPHY

  • Petaia on the short ball.
  • Stewart sliding behind Petaia.
  • Feauai-Sautia on a shorter late line
  • The fourth option is a tunnel ball through the diamond to Campbell.

It’s also clear that there is an overlap with Feauai-Sautia hugging the far touchline while bottom of frame the Reds Pack is starting to reload this short side.

03 Options

I think here perhaps a better options by Stewart than to turn the ball back inside was to draw and pass.

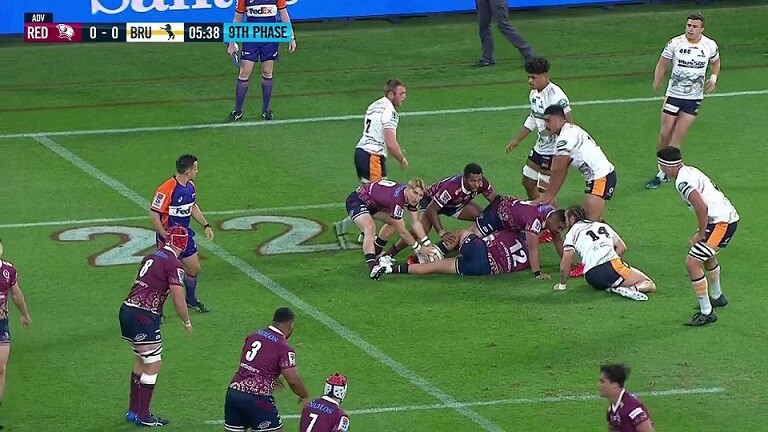
Reds recycle and to keep up the pace there are three quick phases keeping the Brumbies Defence sat on the gain line.

As the reds get to the edge JOC again takes the ball right up and whilst it’s a great step and go from Campbell to make the break it’s important to know how JOC and Campbell operating so close to the line force engages the Brumbies and reduces their chances to recover from any mistakes.

via GIPHY

Great break from Campbell, and already we can see how the Reds flat (or as I prefer tackle line) attack is causing problems.

Now in the Red Zone the reds drop a little deeper.

07 Deeper but Flat Pass

This gives the Reds a little more space to re-set in but to combat this depth JOC gives a flat fast pass to Salakaia-Loto to re-generate speed.

via GIPHY

In the next phase JOC again interests the defence but look at how many options he has under pressure.

09 JOC flat but still with Options

He plays behind to Petaia who sees they are drifting too much and cuts in to stop the defence creeping up and across. 

When the Reds finally come back notice how close to the gain line Tupuo is.

10 Flat Pod

Also note how close to the tackle he gives the ball to McReight forcing all three defenders to bite in on him.

11 McReight Carries Short

via GIPHY

Which brings us nicely to the pay off.

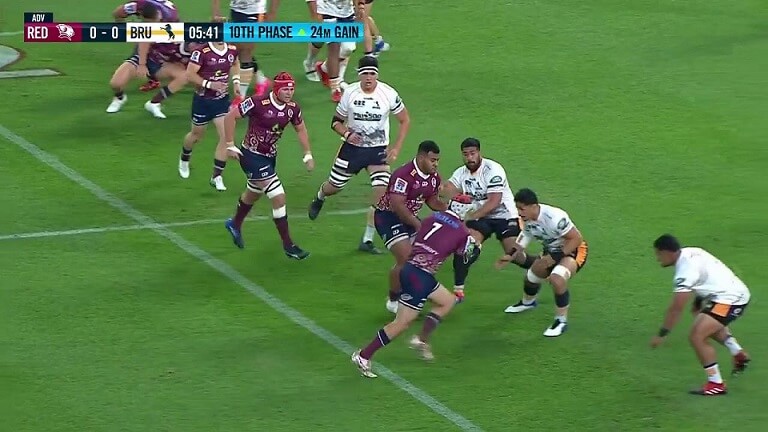
As the ball is recycled look at how many options JOC has.

Inside ball, Tunnel ball through the back, two short runners and a floating chaser who can pop up wherever he feels.

12 JOC Options

JOC dummy cuts and then plays behind. 

Which has pulls Kuridrani in, makes him sit back allowing Campbell to come around and then use a nifty change of pace to take him on the outside.

13 JOC Tunnel Option

Wright knowing he’s totally isolated chances his arm at the block and Cambells gone with plenty of support to pass to when Kuenzle commits sending Wright over. 

via GIPHY

It’s a wonderful score. The offload from Campbell is great and understandably draws a lot of attention.

I think though more importantly we can see the control JOC had over the sequence and how the speed of McDermott at the ruck allowed the Reds to play close to that tackle line.

There is always a lot of talk about the Gain line in Rugby and it’s very important but the Tackle line is something that seldomly gets commented on but is intrinsic to what every team is trying to do.

The Reds throughout this sequence of play know what they need to do and how to beat the tackle line in each case.

As motivation goes, losing by 2 points courtesy of a final minute penalty is pretty good and one of the great things about competition Rugby is that it invariably throws up opportunities to right some (perceived) wrongs.

No matter what coaches may tell you, having a reason to win that is more than just “winning the game” is huge and leading into the Brumbies game the Reds will have been able to use that turn around in Canberra as a trigger for this performance ahead of their semi-final against the Rebels.

Heading into the Semi-Final, having not lost the Rebels and having beaten the tournament favourites was a great place to be, confidence was high and much of what we saw in the Brumbies game played out, a continuation of the Reds ability to engage defenders and preserve space for their pacey back three.

The Brumbies will certainly be a different proposition in the Final but perhaps the biggest factor will be the Reds having to back up aginst a fresh Brumbies.

act brumbies analysis anatomy of a try feature news News queensland reds super rugby reds brumbies
Share. Facebook Twitter Pinterest LinkedIn Tumblr WhatsApp Email
Previous ArticleMonday’s Rugby News
Next Article The Tuesday Top 5
Graeme Forbes
  • Website
  • Facebook
  • X (Twitter)

an Englishman living in France, Graeme runs the Rugby Analysis website thedeadballarea.com. He coaches in his spare time, is an IRB qualified coach and you can catch him on twitter lazily re-tweeting other peoples comments.

Related Posts

Nutta on the loose: tackling and an open letter from RA

December 1, 2023

Can we all play together?

November 30, 2023

Moneyball.

November 29, 2023

The Chewsday Chew – here’s to the ‘grassrooters’.

November 28, 2023
GAGR Podcast
Our Picks

A personal view

November 27, 2023

Moneyball.

November 29, 2023

Can we all play together?

November 30, 2023

The Chewsday Chew – here’s to the ‘grassrooters’.

November 28, 2023
Follow Us
  • Facebook
  • Twitter
  • Instagram
  • YouTube
Don't Miss
Australia

Nutta on the loose: tackling and an open letter from RA

By NuttaDecember 1, 202340

Hello all. In my inbox this morning: “…the tackle height will be lowered to below…

Can we all play together?

November 30, 2023

Moneyball.

November 29, 2023

The Chewsday Chew – here’s to the ‘grassrooters’.

November 28, 2023

Subscribe to Updates

Get the latest news from Green & Gold Rugby.

About Us
About Us

greenandgoldrugby.com is your one stop shop for all things Rugby Union - news, podcasts, opinions, fixtures, events & everything in between.

greenandgoldrugby.com - created by fans of rugby, for fans of rugby.

About
Submit a Story
Authors
Contact
Privacy

Our Picks

A personal view

November 27, 2023

Moneyball.

November 29, 2023

Can we all play together?

November 30, 2023
New Comments
  • Patrick on Nutta on the loose: tackling and an open letter from RA
  • Eloise Pasteur on Nutta on the loose: tackling and an open letter from RA
  • Red Block on Nutta on the loose: tackling and an open letter from RA
  • Rod Finnegan on Nutta on the loose: tackling and an open letter from RA
  • Walt White on Mad Monday with Brisneyland Local #15: Who Dares Wins, unless you’re Rugby Australia.
Facebook X (Twitter) Instagram Pinterest
  • Home
  • Forum
  • Super Rugby
  • Wallabies
  • Podcast
  • Privacy Policy (2023)
© 2023 Ponderosa Publishing Pty Ltd | ABN 76 668 430 386.

Type above and press Enter to search. Press Esc to cancel.