Round 5 saw a dramatic reduction in Defensive Ruck Involvements (DRIs) by 3 Aussie teams, more of the same from one and a significant increase from one side in the only local derby.
The Force has shown week-by-week reduced involvement in DRIs since the opening round high of 117 DRIs to only 36 DRIs against the Chiefs. Clearly the focus has been to maintain the defensive line and keep opposition ball pressure to just a few (Hodgson and Coleman). The Force’s 36 DRIs was <50% of their average.
For the first time the Rebels showed a similar approach against the Highlanders who preferred to kick the ball rather than take it into contact, perhaps in respect of the Rebels Back Row, but it appears to be part of their normal game plan. The Rebels 35 DRIs was ~40% of their average.
The Reds reduction was not so drastic but their 39 DRIs were ~60% of their normal level.
By contrast the Waratahs strategy was to put more pressure on the Reds ball carriers against the normal Reds strong support in Attack Ruck Involvements. Their 84 DRIs was the highest to date and more than 3x their involvement against the Highlanders.
The Brumbies showed their normal level of DRIs against the Cheetahs.
The energetic Waratahs Front Row continues to be busy around the park providing strong support for their ball carriers.
The Rebels Locks (Jones and Timani) showed significant improvements in Ruck Involvements.
The Brumbies Back Row (especially Pocock and Fardy) continue to lead the way in team Ruck Involvements.
The Reds Backs showed strong ruck involvements from Anthony Fianga’a and Eto Nebuli.
Apart from the Front Row, the Waratahs maintain their fairly even work load across all player groups.
The Reds and Waratahs were fairly evenly matched across all player groups.
For the Force, Hodgson (again) and Stander carried the bulk (33%) of the DRI workload; with support from Coleman and R Haylett-Petty (25%).
Pocock and Fardy provided 40% of the DRIs for the Brumbies.
The Force and Brumbies Backs had very limited involvement in DRIs.
The Reds were always under pressure from the Waratahs earning only 3 Turn Overs Won (Waratahs 9 TOW).
A similar story for the Force who earned 4 TOW against the Chiefs 7 TOW.
After Round 5 the Rebels, Blues Crusaders and Jaguares are leading Ruck Success with 96%.
A bad day for the Reds with 16 Missed Tackles and the Force with 22 Missed Tackles (most in the last 20 minutes).
After 5 Rounds the Crusaders are leaders in Tackle Success with 88%.
Good efforts by the Force and Brumbies.
The Reds and Waratahs did well to limit HEs to this level despite the wet conditions.
TOP AUSSIE RUCK INVOLVEMENTS
Remember:
1. Early means 1st or 2nd of player’s team AFTER the ball carrier has been tackled and brought to ground.
2. Impact means active engagement: strong physical contact, changed shape of ruck, clean-out, protecting ball etc. (more than hand on someone’s bum or arriving after the hard work has been done). Yes it’s subjective – but as I collect all data at least it’s consistent.
3. Impact DOES NOT equate to Effectiveness. I’ve concluded that coming up with an effectiveness measure is just too hard in the time that I have available – but open to suggestions.
Ruck Involvements over Time
Back Rows dominated the Total Ruck Involvements, with 4 Locks stepping up and Tessman the only Front Row.
Hodgson again led the list for Total Ruck Involvements. His 8 DRIs were 22% of the Forces total; 0 TOW and 15 Tackles (another hard day in the office).
McMahon’s efforts strongly supported the Rebels ball carriers.
The Cheetahs had no answers to Pocock’s impressive 6 TOWs from his 15 DRIs (1TOW/2.5 DRIs).
A commendable effort by Gill in making this list with only 40 minutes game time.
The best efforts for the Waratahs came from Dempsey (20 rucks, 0 TOW, 3 tackles) and Hooper (19 rucks, 0 TOW and 10 tackles)
REDS V WARATAHS
The only Aussie derby was a war of attrition in a wet Brisbane with the Reds having most of Possession (66%), Territory (66%), scrum dominance and led the penalty count (R8:16W) yet were unable to capitalise with points on the scoreboard. The Reds conceded 25 Turnovers to 17 to the Waratahs and suffered very low Tackling Success (71%).
The single Reds try came from a scrum penalty try early in the match (12 min).
Israel Folau scored 2 tries (18 & 41 min) but the Waratahs were unable to breach the Reds defence during Andrew Ready’s sin binning (43-54 min). The Reds scored 2 penalty goals while down to 13 men to be ahead 15:13 at 48 min.. A late penalty (68 min) was enough to see the Waratahs home.
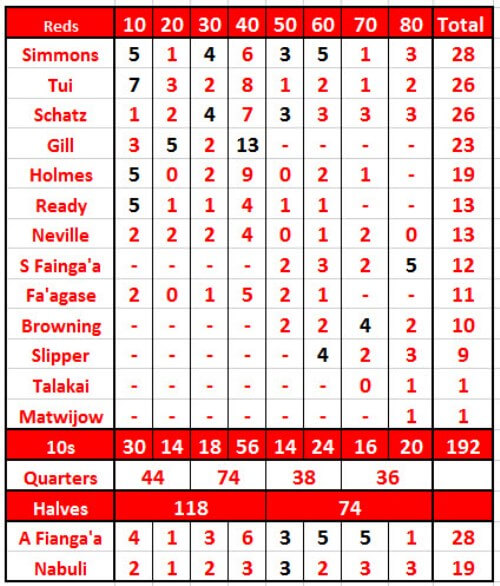
Ruck Involvements over Time
The Waratahs presented a very different strategy for Ruck Involvements from what we’ve seen in their opening 3 games.
Their Total Ruck Involvements (TRIs) were 20% below their previous average with Defensive Ruck Involvements were 70% of their previous average and 3x those against the Highlanders.
Clearly the focus was on causing maximum disruption to the Reds rucks. The strategy worked with the Waratahs earning 9 TOWs to the Reds 3 TOWs. Their TRIs of only 190, matched the Brumbies efforts against the Cheetahs, and is the lowest Aussie total in 5 rounds and 20% below the Waratahs own average from the opening rounds. A very subdued effort. ( or was this part of the game plan?)
By contrast the Reds had their lowest level of DRIs at only 60% of the average of the opening 4 rounds. The Reds TRIs were about 15% below their own average from the opening rounds.
Another big Ruck Involvement effort from Anthony Fianga’a and sound effort from Eto Nabuli.
The most Ruck Involvements by Waratahs Backs came from Nick Phipps (12T – 2A/10D) and Rob Horne (10T – 5A/5D in 43 mins).
Round 6 has Reds having the bye and Waratahs v Rebels involved in the only local derby.


